Showing posts with label mea domus nova ("my new house"). Show all posts

Thursday, April 21, 2011

My Dining Room Gets a Face Lift


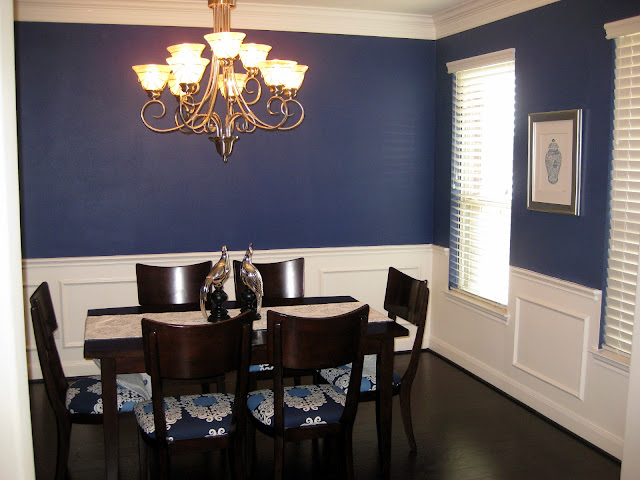
Last weekend while my in-laws were in from Florida for a visit, I finally found the opportunity to recover my dining room chairs. In our old house, I had covered our dining room chairs in a pretty (if a little bit dark) print from Marimekko, but the purple-grey and black print was all wrong for my navy and white dining room. Since moving into our new house in July of 2009, I had put off recovering the set, assuming I would be upgrading my dining room furniture in short order.

Well, flash forward nearly two years later and that dining room set is still there...and not going anywhere anytime soon thanks to a baby and a very expensive backyard renovation. And so, having resigned myself to keeping my furniture for another few years, I decided I should finally get around to recovering the seats. I scored two yards of a pretty blue and white print from Mod Green Pod at 50% off a few weeks ago that's much more in keeping with the room. I won't go into the process of recovering seat cushions as there are a plethora of how-to's online right now (and frankly it's super-easy...if you can wrap a present, you can recover a seat cushion).


I love how the print manages to brighten up the whole set -- sorely needed given the dark tones of the wood, especially against my dark wood floors. I've attempted to bring even more light to the center of the room by adding a white and silver runner from John Robshaw that I scored on One King's Lane a few years ago and a pair of silver peafowl from Joss & Main (yes, I love sample sale sites!). The lovely ginger jar print on the wall is by Anne Harwell and the frame is from ZGallerie.


I'd like to perk this room up a bit further with two other additions: either some great wall art or a mirror for the lone wall (which is visible from the entryway) and some fabulous drapes for the two windows on the left wall. While I continue to hunt for the perfect piece for the wall, I'm working on the drapes right now. I'm in love with Iman's new fabric line IMAN Home available at Calico Corners and have decided to use one of her fabrics for the drapes...the question is, which print?
While I'm leaving heavily towards Option A with its two shades of blue that coordinate with the seat fabric and its larger scale print, I wanted to take a quick poll and see what my readers thought. Besides, who doesn't love a poll?

So you tell me, what do you think?


  • Option A
  • Option B
  • Option C
  • Option D
  • None of the above. I have a better idea!

Monday, March 14, 2011

Master Bedroom Design: Almost There...


Back in December, I updated y'all on my master bedroom (re)design as we swapped out our queen bed for a king and our tiny end tables and dresser for more ample (and more glamorous) storage. At the time, I was dubious as to whether or not I'd be able to get anymore done on the room before Baby G's arrival, as the nursery had become my top priority decorating-wise.

Well, I suppose that nesting instinct really kicked in my last few months of pregnancy and I was able to add a few more decorative touches that really make the room feel more complete. While I'd still like to add some curtain panels around the three-windows and some artwork (or something!) on the wall opposite the bed, I feel like the room is really starting to take shape.


I added this sunburst mirror that I picked up from Horchow on sale over the the long dresser. The finish is a goldish-silver (or gliver) that I think adds some warmth to the room. I didn't want to stick with just silver -- it seemed too matchy-matchy (and a bit cold with all the grey in the room!). The other big change on this end of the room was swapping out my old (and a bit dull) Pottery Barn rug for this graphic cream and blue flatweave from DwellStudio.


My big splurge was this Jonathan Adler screen (also scored at Horchow on sale). I really wanted something substantial in this corner, not only to fill the space, but to help balance out the height of the four-poster bed on the opposite wall. 


I love, love this vintage Chinoiserie lamp. I scored it off High Street Market on Etsy some months ago (alas, it had been languishing in my hall closet for months before I got around to finding a black paper shade for it). I also added a greek key finial for that extra little touch.


A few more shots of the room in its almost finished state. I'll be honest, since the arrival of Baby G. the room isn't looking quite as pristine, what with G.'s bassinet next to the screen and my dresser now cleared off to make way for the changing pad and associated accoutrement. We'll be moving Baby G. upstairs to the nursery in a month or two when his sleeping schedule stabilizes, but for now I'd like to remember my bedroom as the sanctuary it was, rather than the mess it's rapidly become!


Ah well, I know in time we'll get there again!

Monday, February 7, 2011

The Nursery Reveal!


Apologies for being a week late in getting pictures of the nursery up on the blog, but I was waylayed a bit by work and weather last week and couldn't get the finishing touches put in the nursery until this weekend. Last Friday I showed you a photo of the finished window seat, complete with cushions (which I ordered in Sunbrella fabric for maximum stain-resistance/durability). While I stuck with a neutral off-white cushion, I had a contrast welt done in orange to inject a bit of fun and pick up on the orange grosgrain trim on the pillows and pelmet box. 

Dave and I made the pelmet box from some thin pieces of MDF, glued and screwed together and then thickened by Styrofoam (adds a nice visual heft without any extra weight). I then wrapped the three sided box in batting and used a staple gun to affix the fabric. Orange grosgrain ribbon in two thicknesses was then added with some simple fabric glue. My mom and I then made two throw pillows with leftover fabric and trim. The pillows are a simple envelope style, which eliminates the annoyance of sewing in a zipper, but still allows for removal for washing (essential in a kid's room, I'd imagine).

But you've seen this photo already. Time for some new eye candy, right? Before we get to that though, a reminder of what the room looked like before (think storage room):


Inauspicious start, yes? Well, after cleaning the room out (and several trips to Goodwill), I was able to finally get to work on the nursery in December. After several weekends of smaller DIY projects (the crib skirt, pelmet box and pillows), waiting around on painters (didn't have the energy this time around to paint the room myself) and assembling quite a bit of furniture, it's finally finished (well, mostly!):


Of course, the room really won't be finished until Baby G. makes his debut and it gets crammed full of photographs, toys, clothes, diapers....in short, the room really starts to live. But I'm really happy with how the bones of the room have turned out. There's plenty of room to grow, but it's also cozy enough to feel like home straight away.


I'm still in love with my schoolhouse-inspired ceiling fan. I've decided to forgo a mobile over the crib for now because I hear many babies are more enraptured by a ceiling fan than any mobile...and hopefully Baby G. will fall into that group! Besides, it was impossible finding one in my color scheme (and right now I'm not up to the task of making on myself!).


I ordered the glider back in November, but only just received it a few weeks ago. While I loved the aqua-on-blue polka dot fabric in the store, I had some serious reservations almost as soon as I came home: would the polka dots be too loud? Would I regret not going with a solid color? Would the blues work with the wall paint? Fortunately, when the glider finally arrived, I was relieved to see that it wasn't nearly the disaster that I'd built it up in my head to be; in fact, I rather like it and the polka dots are a playful, fun addition to the room without being overly loud.


My mom made a nice lap quilt with more of the O&L fabric. The back and binding is a multicolored polka dot print, which picks up on the polka dot print on the glider and around the monogram.


The "g" monogram and was my first real attempt at wall stickers. I must say, it was easier to apply than I feared and the end result looks like I painstakingly and meticulously painted the monogram on the wall. I gussied up the white Jonathan Adler-knock off floor lamp with some spare grosgrain ribbon (again, affixed with simple fabric glue).


The rug is from DwellStudio and a great buy at $200. At 5'x8' it fits the room nicely and will be a great play area for Baby G. when he gets a little older. I intentionally left a lot of floor space in the room for tummy time, playing, crawling etc. I think all kids' rooms need that extra space for creativity and play.


With little wall space left, Dave and I installed the bookrack from Pottery Barn Kids. I went with an ultraslim rack over a traditional bookcase both because I love how it shows off the colorful kids' books, but also because I had little wall space left that wasn't near a door (and I didn't want to crowd the room out). Currently, it houses my collection of Roald Dahl books as well as some cute board books I received as shower gifts. The top shelf has baby pictures of Dave and I in fab zigzag frames I scored at Furbish Studio (because not everything in a kid's room needs to be from a kid's store!).

Source List:
Crib: Oeuf
Dresser/Changing Table: Oeuf
Window Seat Cushions: CushionSource.com
Bookrack: Pottery Barn Kids
Floor Lamp: ZGallerie
Fitted Crib Sheet: Giggle
Fabric for crib skirt, pelmet box, pillows and throw: Osborne & Little
Ribbon Trim: M+J Trimming
Wall Decal: Elephannie
Letterpress Prints: Sycamore Street Press
Alphabet Poster: Binth
Chevron Frames: Furbish Studio
Ceiling Fan: The Period Arts Fan Company
Wall Paint: Forget Me Not by Benjamin Moore
Ceiling Paint: Icing on the Cake by Benjamin Moore

Thursday, January 27, 2011

Nursery Sneak Peek


The nursery is almost done! While the big reveal will have to wait until next week as I put the final touches on the room over the weekend, I thought I'd whet your appetite with a sneak peek of the window seat, complete with cushions and my DIY pillows and pelmet box (more on both next week). 

In other baby news, my shower is this weekend and I'm really looking forward to catching up with my favorite girlfriends, several of whom are coming down from Dallas for the event. Happy weekend!

Wednesday, January 12, 2011

Nursery: Quick Midweek Update


I came home today to find a completely painted nursery; what a wonderful midweek pick-me-up! I'm loving how bright and clear the pale aqua is. Now all that's left is to starting loading in the room. Stay tuned!

{I should note that I didn't have a surprise visit from the painting fairies. Dave and I decided to bring in the professionals for this paint job given the fact that I'm 32 weeks pregnant and time is of the essence. I have to say though that I could get used to this; so much better than spending my weekend taping, painting and then cleaning it all up!}

In case you've missed out, you can catch up on this nursery design project by clicking HERE and HERE. Also, don't forget to enter for your chance to win a Binth Baby Book! I'll be announcing the winner Friday morning.

Wednesday, January 5, 2011

Happy Second Anniversary, Odi et Amo!

{If I could give you each a Sprinkles cupcake, I would!}

Today marks the completion of my second year as a blogger. 2010 was definitely an exciting time for this little blog as I saw my readership quadruple over the course of the year and my focus -- and my voice -- shift slowly towards the more personal (but I suppose pregnancy will do that to you).

Last year at this time, I featured a roundup of my favorite posts, all of which focused on interior design. This year, I thought I'd celebrate with a roundup my own design projects that I've documented here on the blog over the past twelve months (as well as previews for what's to come in 2011!):


February 2010


March 2010


March 2010


July 2010
The Family Room


December 2010
The Master Bedroom - Stay Tuned for an Update!


December 2010
The Backyard


January 2011
The Nursery - Stay Tuned for an Update!

I can honestly say that without the encouragement of my readers -- and the pressure of getting things done so I could have some blog content -- I would not have been nearly as productive in my mission of turning my new, somewhat cold, house into a home as I was (even if I didn't get it all done). While I doubt any home is ever truly "done" (and goodness, how boring would that be?!), I do feel our home reflects us and our tastes so much more than it did a year ago. Many thanks to you all for your continued support,  kind words and generous spirits. I look forward to a third year of blogging, this time with baby in tow!

Gratias vobis ago!

Monday, January 3, 2011

Nursery: Progress Report


Over the course of the holidays, despite plenty of company and my growing fatigue (and belly!), I did manage to get a good bit done in the nursery. When we last left off, the spare bedroom was essentially our storage room, which meant the first task was clearing it out. After several trips to Goodwill, we managed to empty the room and get cracking. Dave's big task was to remove the light and install the new fan, which has the added benefit of being on a dimmer. I like how the fixture has an old schoolhouse vibe; it's definitely the kind of piece I can use long after the crib is gone.

We've also purchased several of our "big ticket" items like the crib and the dresser (both of which are from Oeuf's Sparrow line). The dresser will double as a changing table. I had initially planned on buying a separate changing table, but decided the temporary convenience of a separate (and higher) space didn't really justify the additional cost. I also got DwellStudio's Draper rug, which ties in with the fitted stripe sheet and I really think it's going to make the room. 


My big DIY for the nursery last week was making the crib skirt. I used the Alphabet Tales print from Osborne & Little's Zagazoo line. While my mom taught me the rudiments of sewing when I was younger, I'm hardly a seamstress, so I opted to go the no-sew route with some Stitch Witchery, an iron and this short DIY video courtesy of Young House Love. Sherry does a wonderful job of walking you through it, so I won't take you step by step here. Instead, I'll just throw in my quickie advice: make sure your measurements are accurate for each side before you cut (and measure the inside, not the outside, of the crib for accurate dimensions, taking into account any support slats, screws or other obstacles that may keep the skirt from laying flat).


After hemming each panel with the hem tape, I used fabric glue to secure orange grosgrain ribbon along the bottom edges and secured each panel to the crib with Velcro (the stick-on kind for the crib and the iron-on kind for the panels). While the skirt might withstand a few washings, it's certainly not for the ages -- indeed, I even had to do some impromptu (and very hackneyed) cutting once I installed the panels to get the skirt to lay flat despite the support slats behind each leg. That said though, I think it looks good and I'm happy with the results.


The nursery is connected to a Jack-and-Jill bathroom that I'm also sprucing up (in the same color scheme) in time for BB Conn's arrival. I found some adorable towels in orange and aqua off ideeli a few months ago, but I'd been having a lot of trouble finding a shower curtain that I really liked in the same colors that didn't read as too juvenile (after all, this bathroom is also connected to our guest room). And so, I decided to make my own...well, I prettied up my own in any event.


I purchased an inexpensive plain white fabric shower curtain and some grosgrain ribbon in orange and aqua. I then used fabric glue to adhere the ribbons to create a wide band across the bottom of the curtain. I actually eye balled the spacing but if you're a bit unsteady (or a perfectionist), then I'd suggest marking your distances with a washable fabric pen. While the fabric glue does a reasonable job of keeping the ribbon in place, I knew that I needed to sew down the ribbon along the edges to really get them to stay flat and hold up in a damp environment (and in the washing machine).

Under the watchful eye of my mother, I used a sewing machine to sew down the edges. I used a clear thread to avoid having to change out the thread for each color. A great tip from my mom: sew the right (or left) sides of all four ribbons in one go and then turn the curtain around and sew the other sides down. This will keep the ribbons from puckering and ensure they lay flat.


Of course, there are still a number of items to check off the list in the next 8 weeks or so before I can call this room complete. Here's the status of my to do list as of last weekend:

(1) Clear the room. 
(2) Paint the walls (Benjamin Moore's Forget Me Not) and ceiling (Benjamin Moore's Icing on the Cake). [Note: I have, for once, decided to outsource the paint job to professionals; hopefully, my painter will be out in the next week or two to get this done.]
(3) Order the crib, dresser, glider and rug.
(4) Install the ceiling fan.
(5) Sew the crib skirt.
(6) Build the pelmet box for the window and upholster in the O&L fabric.
(7) Sew covers for throw pillows to go on glider and window seat.
(8) Order artwork and frames.
(9) Establish a furniture arrangement that optimizes space.
(10) Purchase/install floating shelves above the dresser for photos and diapering essentials.
(11) Arrange and hang wall art.
(12) Organize baby's closet -- wash and fold clothes, store toys and gear, etc.

I'm pleased with the progress so far, but my nesting instinct seems to have kicked into high gear here in the last week or so (perhaps something about hitting the 30 week mark?) and I'm ready to power this out quickly now. I'll keep you posted!

Thursday, December 16, 2010

The Backyard is (Finally) Finished!


Back in August I posted some pictures showing off some preliminary work we'd done to our backyard. Well, four months later I am thrilled to report that we've finally finished landscaping and that I couldn't be happier with the finished results. While we spent a huge chunk of my 2010 bonus on the yard, both Dave and I believe that we've managed to create a little something out of the ordinary, something that would set our home apart from our neighbors, and somewhere that we'd be happy to spend our spare time given that Baby Boy Conn's arrival will almost certainly mean an end to our big trips (at least for now). In short, I think it was worth the money...and the wait.


Probably the single biggest change to the yard was the extension of the patio and the construction of the pergola. We decided to go with the same brick as the house and the same paint as the trim for a seamless look and I must say that the finished product looks like it came with the house.


Our landscaper Kevin insisted that we must have pots (and big ones!) for annuals and some small citrus. Dave was hesitant initially (both because of cost and an inexplicable aversion to pots) but we found some simple, inexpensive gray pots at a local garden center that blended perfectly with the crushed granite beds and that we're both happy with. I must say that these may be my single favorite element in the design as they add both height and color around the patio.


The side entrance to the backyard has been transformed from ho-hum to something quite lovely. Note the Meyer Lemon tree on the right. I can't wait for those babies to ripen so I can use them to make some lemon pistachio cookies for the holidays! We still need to add a few pavers to the pathway (and let the grass grow back in), but come spring when the hydrangea bloom this corner of the yard will be almost magical.


We decided to erect a few screens to block the view of our red brick fence (which isn't awful, of course, but it does rather clash with the brick on our house). I love the circle motif on the screens, which echo the circular fire pit and break up all the straight lines of the fences. Vegetation is a mix of tropicals (an orchid tree, hibiscus), citrus (several orange varietals), native Texas plants, and more traditional garden plants (camilas, roses, etc.).


Absolutely love the vivid silver of the Texas sage, especially against the darker green of the rose bushes. Can you see the large planters behind the screens? They've been seeded with wildflowers and I'm looking forward to seeing what pops up this spring.


The patio extension and fire pit are flanked by six crepe myrtles, which come spring will be in full bloom through most of the summer. We've planted a few wisteria at the base of the pergola. Kevin promises that they'll quickly grow up and along the pergola, creating a wonderful canopy of violet and deep green. I love the romantic quality of wisteria -- there's something very Southern about it -- and I look forward to spending some quiet afternoons sitting outside, sipping lemonade and playing with the baby.


Ah the fire pit: Dave's big "want" that I'll admit I was a bit dubious of at first. I insisted we put it away from the house and Kevin came up with a great solution for making it blend in perfectly with the rest of the design. The low wall behind it provides excellent seating for toasting marshmallows or just sipping a beer or two. We actually built a fire on Sunday for the first time and had a lovely time sitting outside in the chilly weather enjoying the smell of burning wood (it's rather intoxicating, no?) and watching the fire. I'm having family over for Christmas Day dinner and I'm hopeful that the weather will cooperate so we can build another fire and move the party outdoors.

If you live in the greater-Houston area and your yard is in need of some serious sprucing up, I'd highly recommend Kevin Boyd (of Nature's Realm) for any sort of landscaping or hardscaping needs. He was by far the most creative landscaper we spoke with and his ideas really helped make our less-than-defined vision a reality.

Tuesday, December 7, 2010

Master Bedroom Design: Progress Report


It's been a few months now since I first posted about my plans for our master bedroom, but I promise that I didn't forget about it, despite my baby haze. In fact, real progress has been made towards achieving my initial vision and I'm excited to share the changes the room has undergone in recent weeks.


I've swapped out our queen size bed with a larger king. I selected a modern, black version of a Shaker pencil post bed from Ethan Allen to help fill up some of the vertical space in the room. I had initially considered getting the canopied version of this bed and leaving the canopy frame bare, but ultimately decided to go with the four-poster (though it can always be converted to a canopy later fairly inexpensively).


My almost all-white bedding also got traded out with far more colorful peacock dove bedding from DwellStudio. For me, this is the change that really makes the room...well, make sense. The print brings out the blue-gray of the walls, the metallic slate gray of the ceiling and even the black of the bed frame. The print's modern take on Chinoiserie helps tie in the existing Japanese woodblock art above the bed. In short, the bedding looks like I picked it out first (rather than vice versa, which I'll admit was a bit ass backward of me but no matter...) and based the entire room around it.


The other major change in this space is that I replaced the too small, matchy-matchy side tables with a larger side table and long dresser. Initially, I had planned on going with all-mirrored options, but ultimately selected these white and mirrored babies from ZGallerie's Concerto line for two big reasons: (a) I am way too type-A to not let smudged mirrors get to me -- and, let's face it, they'd inevitably get smudged, cracked, etc. with a new puppy and a baby on the way; and (b) these pieces were way, way cheaper than the ones I had initially chosen. As an added bonus, I got them in just a few short weeks instead of the typically 8-12 week lag of more expensive furniture. I was a bit concerned about quality given the relatively low price and the fact that I'd never purchased ZGallerie furniture before, but I'm happy to report that these are both very solid, well built pieces that look far more expensive than they actually were.

So what's left? Well, I still need to trade in my drab, too small 5 x 8' rug for a larger, punchier 6 x 9'. I'll still mulling over whether or not I am going to go for the Madeline Weinrib Greek key, which means I should probably keep looking to find something I love even more. I'm also in desperate need for large-scale art or a screen (or something!) for the wall across from the bed. Replacing the sleigh bed freed up more floor space as this four-poster sits tightly against the wall, so I'll also be looking for a deep bench or maybe even a small sofa for the foot of the bed. Finally, fixed drapery panels on either side of the windows will add the finishing touch to the space. Of course, I'll keep you posted, but I can't guarantee much more progress before Baby Boy Conn's arrival in early March!