Showing posts with label food. Show all posts

Sunday, June 5, 2011

Cute 4th of July Decorating Ideas

Throwing a July 4th party or simply want to add some patriotic touches to your home? In any case, here are some darling and inspiring Independence Day decorating and entertaining ideas to get you in the holiday spirit.

cute july 4th picnic table setting stars stripes
{Patriotic Table Setting via Southern Living}

cute july 4th party supplies paper goods
{Red, White & Blue Paper Goods from Shop Sweet Lulu}

cute 4th of july desserts
{Festive July 4th Desserts: top - berry cupcakes via Martha Stewart, flag rice crispy treats; bottom - flag tart via Martha Stewart, chocolate covered strawberries via allrecipes.com, patriotic parfaits via Martha Stewart.}

red white blue july 4th paper lanterns
{Paper Lanterns via Pier 1 and 4th of July Signage via Pottery Barn Kids}

diy 4th july banner
{DIY July 4th Rosette Banner via Country Living}


How will you be celebrating July 4th?

Sunday, April 24, 2011

Happy Easter and Lamb Cake

easter lamb cake mold dessert
Here’s a picture of the sweet lamb cake my mom made for today’s Sunday brunch. It was topped with vanilla frosting , flaked coconut, raisin eyes and a pink jelly bean nose. The cake mold used was my grandmothers! So darn cute... it was hard to cut into!

Happy Easter!

Tuesday, April 5, 2011

Party in my Mouth

So I know this is not a food blog, but this is too good to keep to myself.

Sunday night my hus and I decided to treat ourselves to dinner at the Bazaar - an amazing restaurant here in LA that specializes in molecular gastronomy (basically, all the crazy-science-based food tricks you see on Top Chef.) The chef takes these tricks and add an incredible twist to Spanish tapas...

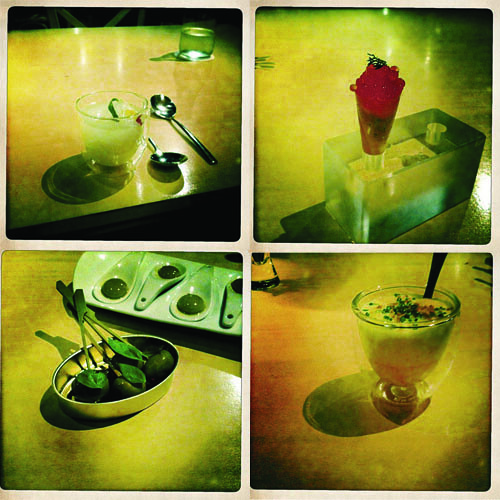
Here's a peek into our 9 course meal (yes, I'm still full two days later.)
food1
Clockwise from top left: Capirinha (a Brazilian drink - they turn the liquor into a sorbet using liquid nitrogen.) Bagels and lox (salmon roe and cream cheese in a yummy cone). Tortilla de patata (a potato foam with an egg cooked slowly so that the yolk and white are the same creamy consistency when cooked.) Olives two ways (normal olives in front, party olives in the back. They make fake olives by dipping olive juice into a solution that creates a skin around it. My favorite.)

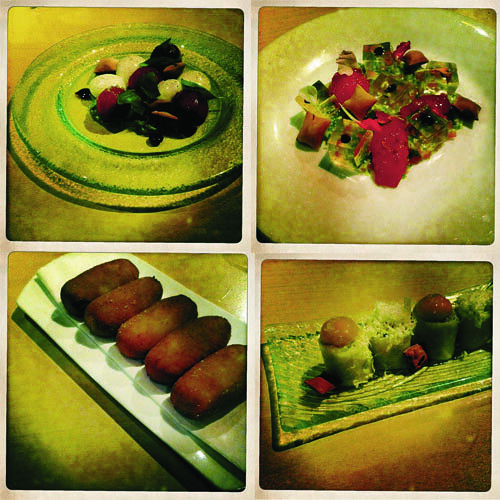
food2
Clockwise from top left: Caprese Salad (with balls of liquid mozzarella that explode in your mouth), Gazpacho (using a gelatin-ized tomato broth), Caesar Salad (deconstructed with a quail egg yolk on top), Chicken Croquettes (deep fried chicken and bechamel - a Spanish classic.)

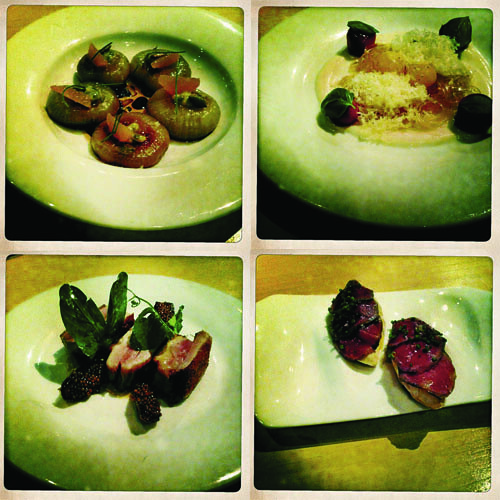
food3
Clockwise from top left: Cippolini onions (only dud of the evening), Lemon Spaghetti (noodles made from lemon juice), Philly Cheesesteak (the bread is filled with air, the cheese tastes like magically light foam. I want to eat this everyday.) Chicken with Mustard Caviar (now I understand why everyone on Top Chef cooks the food sous vide - slowly in a pouch in a water bath - the most amazing chicken ever.)

I've been 5 times in 2 years, and I still want more. If you come out to LA you HAVE to eat here. And call me, because I'll come too.

All photos taken by me on my iPhone using the Hipstamatic app...

Tuesday, November 9, 2010

Chocolate Yumminess

A few weeks ago, my friend Jessica (of Life's Little Gems, one of my favorite blogs) and I took a chocolate making class at the Urban Craft Center here in LA.

I had no idea what I was getting myself into, but basically, you melt cacao butter and a sweetener together over a double boiler, add cacao powder, blend, then add any extras (milk for milk chocolate, mint extract for mint yumminess, etc). It is both easy and difficult - it is fairly fast to make, though there are many silly things you can do that can really mess it up.

The chocolate I made in the class turned out terrible (or I guess as terrible as chocolate can be) - the sugar I used refused to melt so I ended up with a pool of granulated sugar at the bottom of each chocolate (we were working over electric portable burners, which didn't get very hot.)

This time I used amazing raw honey, so I wouldn't have the sugar dissolving issues again - turned out great!

I used a few different type of molds - this awesome Day of the Dead themed mold for dark chocolates...


And a heart shaped mold for my milk chocolate yummies. We had much fun making our chocolates Sunday night - next time we plan on getting really experimental and gourmet - think bacon and sea salt!

Monday, October 25, 2010

Culinarium 2010 Highlights: Christopher Peacock Kitchen Design, Chic Hors D’oeuvres & Color

culinarium 2010 SFDC San Francisco
Last week the San Francisco Design Center {SFDC} hosted Culinarium 2010 which celebrated the center of every home, the kitchen . Over the course of three days there were kitchen design keynotes and seminars by renowned designers along with cooking demonstrations by celebrity chefs. The event kicked off with a panel discussion that celebrated Design, Food & Fashion and included San Francisco Magazine's style director Elizabeth Varnell, Food and Wine editor Jan Newberry and contributing design editor Diane Doran Saeks.

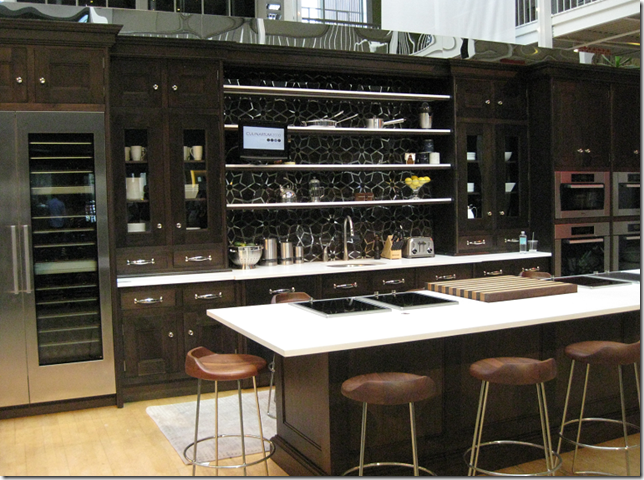
culinarium christopher peacock kitchen ann sacks miele walnut cabinets
In the SFDC’s Galleria atrium, Christopher Peacock Home built out a spectacular fully functioning kitchen featuring Silestone quartz countertops, Ann Sacks tile backsplash, Miele appliances and Toshiba high-tech flat screens. The entire kitchen was assembled in two days! This isn’t the first time Christopher Peacock Home has built display kitchens like this; In partnership with House Beautiful, he built the 2008 Kitchen of the Year in Rockefeller Plaza and built the kitchen for Oprah's television stage set in 2009.

culinarium house beautiful panel newell turner christopher peacock
House Beautiful Editor-in-Chief, Newell Turner {far left} lead the panel discussion “The Kitchen: The New American Living Room.” Turner started the discussion explaining that kitchens are no longer detached from the design story. From family meals, to kids’ homework, to entertaining. The kitchen is the hub and the “new” living room. He also added that today’s kitchen is made to be more personal, comfortable and technologically advanced. The panel included Christopher Peacock, Founder & Designer of Christopher Peacock Home {middle left}, Michael Merritt, Director of Merchandising Ann Sacks {middle right} and David Karigaca, Sales & Builder Division Manager, Miele {far right}.

culinarium christopher peacock kitchen island tile backsplash ann sacks
Christopher Peacock had the cabinets built in walnut stained in a dark brown. The cabinet doors are recessed and kept simple. The cabinetry is dressed up with hardware by Christopher Peacock Home. The oversized pulls in nickel are especially beautiful. The gorgeous backsplash, eastern star by Ann Sacks is “artwork” in the space and the starting point for the kitchen’s design. The Turkish inspired pattern features stainless steel and rich chocolate tiles. The geometric pattern was originally smaller, but Ann Sacks custom adjusted the size to meet Peacock’s vision.

The large kitchen island topped with Silestone quartz showcases Miele appliances and a thick striped wooden cutting board.


Speaking of appliances, David Karigaca of Miele said that their steam ovens are in demand. I want one! He explained that Miele appliances are made with “clean touch steel” and that they wipe clean with a simple rag {no harsh stainless steel cleaners needed}.

culinarium christopher peacock kitchen miele refrig wine
One of the most talked about features in the kitchen was the refrigerator and wine refrigerator combo by Miele. Each a separate unit, it was Peacock’s vision to combine the two in this San Francisco kitchen so near to the famous wine country.

culinarium miele wine refrigerator walnut shelves
Inside the wine refrigerator, the folks at Miele has shelves made in walnut to coordinate with the rest of the kitchen. The lighting inside both the refrigerators excited Newell Turner. It is indeed elegant and innovative {helps keep the temp in the units constant}. In addition, the cutting-edge Miele appliances are self-diagnosing and will send a homeowner an email if their is a problem, repair, or maintenance needed. Truly amazing.

culinarium nesting newbies hors d'oeuvres for entertaining
Renaissance woman and chef, Lea McIntosh of Nesting Newbies lead a cooking demonstration on how to create upscale hors d’oeuvres for entertaining. She taught her no-fail techniques to blogger Jeanine Hays of AphroChic {pictured right}. Together the two created three simple, delicious and sure fire winning hors d’oeuvres: Pear Muscat Marmalade {recipe here}, Medjool Dates Stuffed With Goat Cheese {seriously easy} and Truffle Honey Holiday Baked Brie. Yum.
Here is the recipe for the Truffle Honey Holiday Baked Brie:

Ingredients:
1 sheet puff pastry
1 tbsp salted butter {melted"}
2 tbsp pecan pieces
1 tbsp white truffle oil
2 tbsp honey
1 eight oz. wheel brie
1 whole egg {beaten}
1 piece kitchen twine

Method:
1. Defrost puff pastry for approximately 15 minutes and unfold onto a baking sheet covered with parchment.
2. Ina small bowl, combine butter, pecan pieces, white truffle oil and honey; set aside.
3. Place brie in middle of pastry; pull flaps of dough up around edges to top of cheese, pressing dough against side of brie and gathering together at the top.
4. Before sealing dough flaps, pour honey mixture over brie right before squeezing together excess dough and tie with a piece of kitchen twine.
5. Brush beaten egg over top and side of pastry.
6. Bake in 375 degree oven about 20 minutes until pastry is golden. Serve warm with French baguette slices.  

culinarium chocolat tart chef Tyler Florence {image via Living in Color with Sonu & Tyler Florence}

Speaking of food, Bob Chin and Sonu Mathew of Benjamin Moore talked about the “Social Palette – how trends, social media and palates influence color.” it was a beautifully rich presentation tying our passions for food and color. The mouth-watering photo of a chocolate tart is from Chef Tyler Florence's new book, “Tyler Florence Family Meal: Bringing People Together Never Tasted Better.” It was so fun getting to meet Sonu too. Her blog, Living in Color with Sonu has been a favorite design blog of mine. Be sure to drop by for some serious color inspiration.

Culinarium 2010 ended on a spirited note with “The Art of the Cocktail” featuring Perry’s bartenders and the San Francisco 40-year institution’s signature cocktails. All proceeds of the event will benefit the Design Trade Resources Association.

I can’t wait to see what is in store for Culinarium 2011!


*all images property of Simplified Bee unless stated

Thursday, September 2, 2010

Must Read: Nesting Newbies {Issue 4}


The virtual magazine, Nesting Newbies released their fourth issue yesterday and it 's gorgeous! In addition, I was thrilled to be one of the bloggers asked to answer a question in the Nestimonials section . The answer to my question, "For those of us with young children, how should we start getting them organized for going back-to-school?" can be found on page 184.


This 200+ page issue is full of fun, fresh and easy cooking, entertaining and decorating ideas. It was completely inspiring! Here are some of my favorite images from my favorite articles:
 
You will have to drop by Nesting Newbies to take a look  and read for yourself. I am sure it will leave you inspired too!

Monday, August 30, 2010

Keeping Backyard Chickens & Green Roof Coop Design


For sometime and long before the recent massive egg recall, I have been toying with the thought of getting pet chickens. That's right our feathered, egg laying friends. And it seems I am not the only one enthusiast about the idea. Keeping a flock of backyard hens is  stylishly vogue and a growing trend in both suburban and urban communities. 

A friend of mine was kind enough to let me take some pictures of her backyard hen house where her three Rhode Island Reds live, sleep and lay beautiful brown, organic eggs.


The coop provides shelter for the hens {holds up to four} and incorporates a  beautiful green roof design. The garden-on-top design keeps your flock warmer in the winter, cooler in the summer, and even provides sound insulation in rainstorms. Similar coop plans are available to purchase at My Pet Chicken.


My friend planted drought tolerate succulents in her roof garden, but a veggie garden would be fun if enough sunlight. I love the rooster ornament - many municipalities ban the real ones, but don't worry hens lay eggs without them. 


The roosting pole and practical ramp appears to get lots of use. To feel safe, the hens need a raised roosting area that provides at least 2-4 square feet per bird. The hens will get too stressed if overcrowded. Go here for more important chicken coop requirements.


 Here is a view of the roosting area and access to the eggs.


I was surprised to learn that some hens can develop an egg-eating habit. To break it, 
fake eggs, usually made of porcelain or plastic replace the real ones as soon as they are laid. In this case, my friend simply used a golf ball and that did the trick.


Chickens will need free roaming time if a coop does not provide a minimum of 10 square feet per fowl. Although they can be a bit messy, chickens are great foragers and enjoy eating insects, grasses and slugs and snails. Above is a shot of my friend's hens in action.


If you are interested in learning more about raising chickens in an urban environment, please visit the Urban Chickens Network blog. 

Now, I just need to do two things. First, convince my hubby to build a chicken coop. And second, to decide what kind of chicken to get. Perhaps a brown egg layer like the Rhode Island Red, Delaware or Speckled Sussex? Do you have chickens? What would you recommend?

Thursday, August 19, 2010

Bake-N-Blog: Chocolate Cupcakes with Mint Marshmallow Frosting

Normally I don't write about food, but when fellow design blogger, Staci Edwards of  Ontario asked who would be up for baking-n-blogging about one of Ming Makes Cupcakes desserts, I jumped right in. With thirty-three gourmet cupcake recipes to choose from, it wasn't easy to narrow it down. Cupcake #8, Chocolate Cupcakes with Mint Marshmallow Frosting was the one I selected because it looked like one I couldn't mess up. Here is the recipe:

The cupcakes were a breeze to make and I presented them to my Dad for his birthday. He and several other tasters gave them two thumbs up! The cupcakes were super moist and the cool marshmallow mint frosting was a nice compliment to the rich chocolate. Can't go wrong with this recipe!

Thanks Staci for this fun blogging opportunity and to see more yummy cupcakes go here.

Happy baking!

Tuesday, July 27, 2010

So I know this isn't a food blog...

But this image of a cheese and charcuterie platter (from Canadian House and Home) has me a) hungry and b) hunkering to hostess a party!

Thursday, December 3, 2009

R is for... Recipes

As I often Twitter about, I am a HUGE foodie. Between LA restaurants and cooking at home in my kitchen (my favorite room in our home), I put almost as much thought and effort into food as I do into interior design! And let's be honest, they are totally related. A beautiful home really ought to be filled with beautiful food and wonderful aromas.

Here are some of my favorite things to make:

This French toast recipe from the Barefoot Contessa was featured in House Beautiful. It was DELISH!

French Toast Bread Pudding
Serves 8

  • 1 challah bread, sliced 3/4-inch thick
  • 8 extra large eggs
  • 5 cups half and half or milk (I used whole milk)
  • 3 tablespoons honey
  • 1 tablespoon freshly grated orange zest
  • 1 teaspoon pure vanilla extract
  • 1/4 teaspoon kosher salt
  • Confectioner's sugar and pure maple syrup for serving

1. Preheat the oven to 350 degrees
2. Place the bread in two layers in a 9 x 13 x 2 square or oval baking dish, cutting to fit the dish, and set aside.
3. In a large mixing bowl, whisk together the eggs, milk, honey, orange zest, vanilla and salt. Pour the mixture over the bread and press the bread down to soak completely.
4. Place the baking dish in a larger roasting pan. Add very hot tap water to come an inch up the side of the baking dish. Cover the roasting pan tightly with aluminum foil, tenting it so the foil doesn't touch the pudding. Make two slashes in the foil to allow steam to escape. Bake for 34 minutes, remove the aluminum foil, and bake for another 40 to 45 minutes, until the pudding puffs up and the custard is set. Remove from the oven and cool slightly.
5. Using a small sieve, sprinkle with confectioners' sugar and serve in squares with maple syrup for drizzling.

Here's how mine turned out.
And we had leftovers for a few days too :) And I got a bit fancy with my maple syrup drizzling.


I have also Twittered about my yummy homemade Caesar Salad dressing (courtesy of Guy Fieri from the Food Network)
Here's what mine looked like (once it was 99% eaten!)
  • 1 egg (please do not use raw egg if you aren't comfortable/aren't able to for medical reasons - if you want to know what those are - click here.) I usually only use the yolk
  • 1 teaspoon Worchestershire sauce
  • 2 cloves garlic, minced
  • 1/3 cup lemon juice
  • 1 teaspoon anchovy paste
  • 1 cup extra-virgin olive oil
  • salt and freshly ground pepper
  • 3 heads of romaine lettuce
  • 1/3 cup grated parmesan, for garnish

1. Beat the egg in a large mixing bowl. Add the rest of the ingredients except the lettuce and cheese and whisk to combine.
2. Cut the stems off the heads of Romaine and fan out the lettuce on a serving platter. Sprinkle the parmesan over the lettuce and drizzle the dressing on top. Serve immediately.


Two nights ago I made a recipe from the Williams-Sonoma catalog and my tummy and my hubby were both very grateful.


The meatballs are stuffed with mozzarella cheese, which melts when it cooks and is divine!
  • 3 tablespoons olive oil
  • 1 yellow onion, finely diced
  • kosher salt and freshly ground pepper
  • 3 garlic cloves, minced
  • 2 cups torn pieces crustless white bread
  • 1/2 cup buttermilk
  • 2 pounds ground beef
  • 1/4 cup chopped fresh flat-leaf parsley (plus I used more to garnish at the end)
  • 1 teaspoon finely chopped fresh thyme
  • 5 oz. mozzarella cheese, cut into 1" cubes
  • 7 cups tomato sauce (I used jarred - shhh!)
  • 1 1/2 pounds spaghetti, cooked and drained
  • Grated Parmesan for serving

1. In a large saute/simmer pan over medium heat, warm 1 tbs oil. Add onion and salt; cook 10 minutes. Add garlic; cook 1 minute. Let cool. In bowl, combine bread and buttermilk. Add beef, onion mixture, parsley, thyme, 2 1/2 tsp salt and 1/2 tsp pepper. Mix with hands until cohesive. Form into 10 meatballs (I made mine smaller so I had more.) Stuff cheese cube into center of each one; re-roll meatball.

2. In same pan over medium high heat, warm 2 tbs oil. Brown meatballs in 2 batches, 8 minutes per side. Transfer to plate. Pour tomato sauce into pan; add meatballs. Simmer over medium heat, turning meatballs once, until cooked through, 25-30 minutes. Serve spaghetti in bowls, top with sauce and meatballs. Top with cheese.

3. Yum.


One of my husband's favorites, and a perfect winter dish, is this Asian Short Ribs recipe from Real Simple. It doesn't look too pretty in the picture, but it tastes amazing.
  • 1/2 cup low-sodium soy sauce
  • 1/3 cup brown sugar
  • 1/4 cup rice vinegar
  • 2 cloves garlic, peeled and smashed
  • 1 tablespoon grated fresh ginger
  • 1/2 teaspoon crushed red pepper
  • 8 beef short ribs (about 4 pounds)
  • 4 medium carrots, peeled and halved crosswise
  • 1 small green cabbage (about 1 pound), quartered
  • 2 tablespoons cornstarch
  • 1 tablespoon sesame oil
  • 4 scallions, thinly sliced (optional)
1. In a 4- to 6-quart slow cooker, combine the soy sauce, sugar, vinegar, garlic, ginger, and red pepper. Add the short ribs and carrots and arrange in a single layer. Lay the cabbage on top.

2. Cook, covered, on high for 5 to 6 hours (or on low for 7 to 8 hours―see note below), until the meat is tender and easily pulls away from the bone.

3. Transfer the cabbage, short ribs, and carrots to plates. With a large spoon or ladle, skim the fat from the cooking liquid and discard.

4. If the slow cooker is on the low setting, turn it to high. In a small bowl, whisk together the cornstarch with 1 tablespoon of water until smooth. Whisk into the cooking liquid and cook until thickened, 2 to 3 minutes. Stir in the sesame oil. Spoon the sauce over the short ribs and vegetables and sprinkle with the scallions (if using).


I am a huge fan of lentils. Tasty. Filling. Yum. This image is from Metropolitan Home, but the recipe, which doesn't include bacon or a poached egg is from Epicurious. But adding bacon and a poached egg could only make it better (I think when in doubt, add bacon.)

1 2/3 cups lentils (11 ounces), rinsed well
5 cups water
3 1/2 cups reduced-sodium chicken broth
1 Turkish or 1/2 California bay leaf
4 garlic cloves, finely chopped, divided
2 tablespoons extra-virgin olive oil
1 pound sweet Italian sausage links, cut into 1-inch pieces
1 medium onion, finely chopped
2 medium carrots, finely chopped
2 celery ribs, finely chopped
2 tablespoons tomato paste
1/2 pound escarole, chopped (4 cups packed)
1 to 2 tablespoons red-wine vinegar

1. Simmer lentils, water, broth, bay leaf, and half of garlic in a 4-quart pot, uncovered, 12 minutes.

2. Meanwhile, heat oil in a wide heavy 5- to 6-quart pot over medium-high heat until it shimmers. Brown sausage, about 7 minutes. Transfer sausage with a slotted spoon to a bowl.

3. Reduce heat to medium and cook onion, carrots, celery, remaining garlic, 1 teaspoon salt, and 1/2 teaspoon pepper, stirring occasionally, until softened, about 5 minutes. Stir in tomato paste and cook, stirring, 2 minutes. Add sausage and lentils with cooking liquid and simmer, uncovered, until lentils are tender, 3 to 5 minutes.

4. Stir in escarole and cook until tender, about 3 minutes. Stir in vinegar to taste and season with salt and pepper. Discard bay leaf.


This final dish, one-pot salmon from Real Simple is super easy, super delish, great for making if you are having guests over on a school night.


  • 1 cup long-grain white rice
  • 1 pound salmon fillet, skin removed
  • kosher salt and pepper
  • 4 ounces sugar snap peas, trimmed
  • 1/3 cup low-sodium soy sauce
  • 4 scallions, trimmed and sliced
  • 2 tablespoons rice vinegar
  • 1 tablespoon grated ginger
  • 1 tablespoon dark brown sugar
1. Mix the rice and 2 1/3 cups water in a medium skillet. Bring to a boil. Reduce heat to low and simmer, covered, for 10 minutes.

2. Slice the salmon on a diagonal into four 3/4-inch-thick pieces. Season with 1/4 teaspoon salt and 1/4 teaspoon pepper. Place on top of the partially cooked rice. Cover and cook 7 minutes.

3. Scatter the peas over the salmon and rice. Cover and cook until the rice and peas are tender and the salmon is opaque and beginning to flake, 3 to 5 minutes.

4. Mix the soy sauce, scallions, vinegar, ginger, and sugar in a small bowl. Spoon the sauce over the salmon, rice, and peas and serve.


As Julia Child would say, "Bon Appetit!"